Prediction Serving API#


Introduction#
For our purposes we will be interested two aspects of the REST architecture: 1) having a uniform interface for transferring resources between client and server, and 2) that each request from the client to the server must be stateless. In particular, looking at a request provides us all the context used by the server to process the interaction. Note that this does not necessarily mean that the result of this interaction is deterministic.
In this notebook, we will develop an API that exposes a single POST endpoint that serves prediction from the regression model described in the previous article. This can be consumed by an application as a dependency or as a separate microservice. Note that while we will keep REST principles in mind, we only loosely adhere to them. In particular, we will be using FastAPI as the web framework for developing our API.
Code overview#
The structure of the resulting package for our API looks like this:
api/
├── app/
│   ├── schemas/
│   │   ├── __init__.py
│   │   ├── health.py
│   │   └── predict.py
│   ├── __init__.py
│   ├── api.py
│   ├── config.py
│   └── main.py
├── tests/
│   ├── __init__.py
│   ├── conftest.py
│   └── test_api.py
├── Procfile
├── mypy.ini
├── tox.ini
├── requirements.py
├── runtime.txt
└── test_requirements.py
First, we have two requirements files requirements.txt which specifies versions of libraries used in running the API, and test_requirements.txt that contains versions of tools that we will during development, such as testing, linting, and type checking. The important thing to note here is that we include the regression model package in the main requirements file.
regression-model-template==0.1.0
Tests are stored in the tests/ directory. The file mypy.ini contains configurations for type checking. And tox.ini file contains definitions of tox environments that we will be using, e.g. run for running the server in debug mode. Finally, the Procfile and runtime.txt are files needed when deploying later to Heroku.
The main functionality of our API is contained in the app/ folder. The schemas/ folder contains the Pydantic models for data that will be passed into and out of the endpoints. Then, we have four modules: __init__.py contains the API’s version, api.py which defines the API endpoints, config.py which handles configuration mostly about logging, and main.py combines everything together so that the API runs. Running the API can be conveniently done using tox:
$ tox -e run
The uvicorn server should be running in localhost:8001 after installing the necessary dependencies. Note that we get a warning for running the server in development mode.
run run-test: commands[0] | python app/main.py
2022-04-14 17:50:29.396 | WARNING  | __main__:<module>:55 - Running in development mode. Do not run like this in production.
INFO:     Started server process [63671]
2022-04-14 17:50:30.870 | INFO     | uvicorn.main:serve:405 - Started server process [63671]
INFO:     Waiting for application startup.
2022-04-14 17:50:30.870 | INFO     | uvicorn.lifespan.on:startup:22 - Waiting for application startup.
INFO:     Application startup complete.
2022-04-14 17:50:30.871 | INFO     | uvicorn.lifespan.on:startup:34 - Application startup complete.
INFO:     Uvicorn running on http://localhost:8001 (Press CTRL+C to quit)
2022-04-14 17:50:30.873 | INFO     | uvicorn.main:startup:492 - Uvicorn running on http://localhost:8001 (Press CTRL+C to quit)
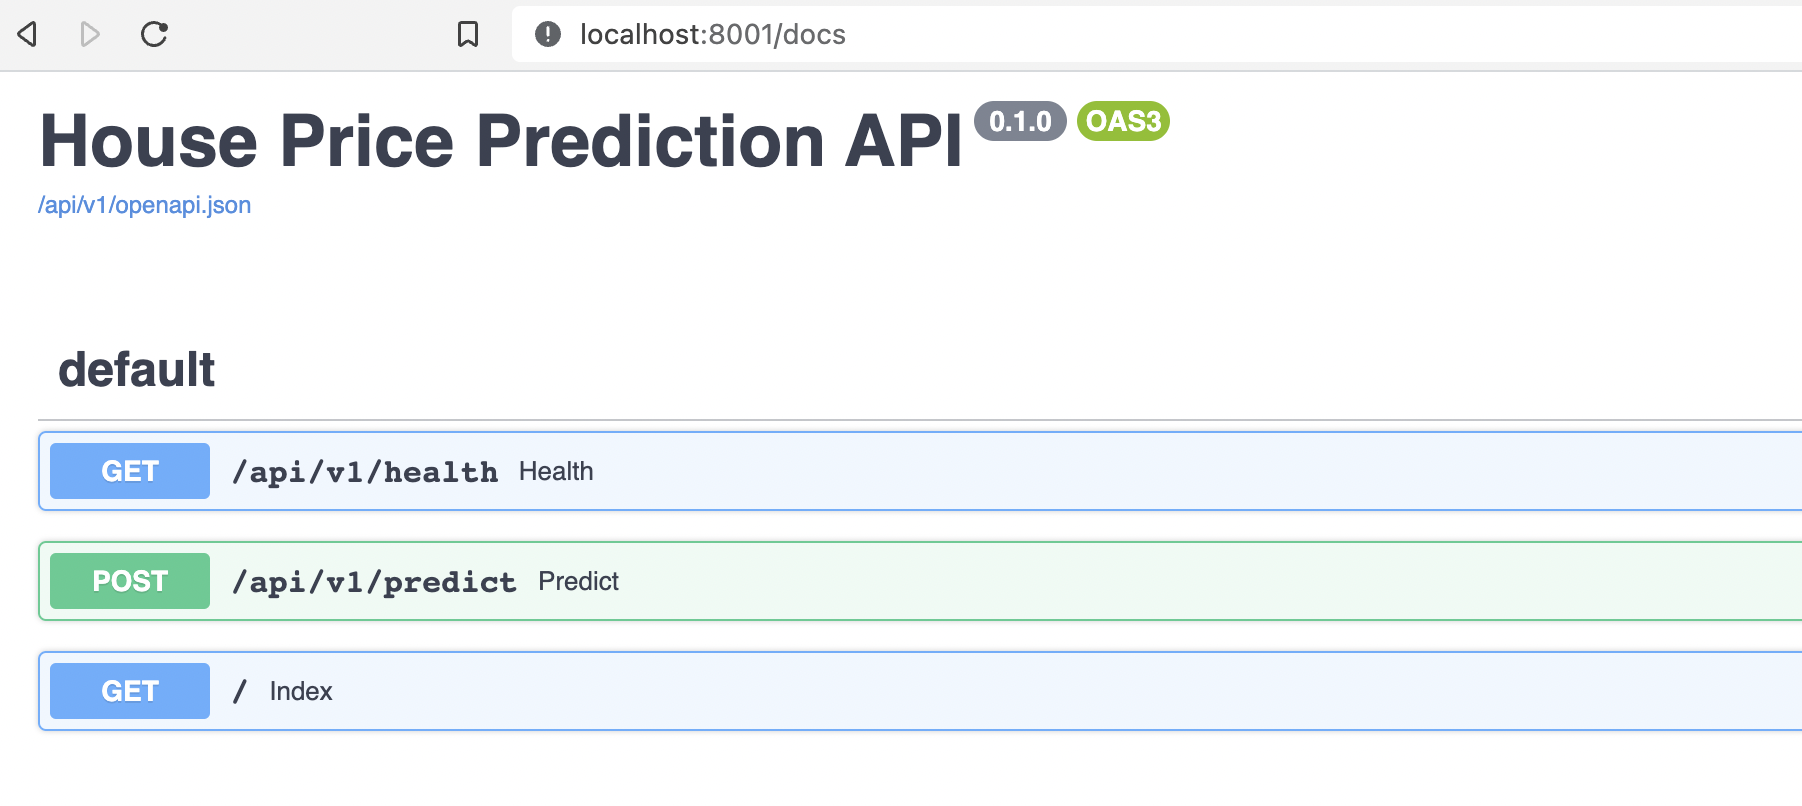
Going to http://localhost:8001/docs we can see the available endpoints. First we can try out health endpoint which should give us the JSON response:
{
  "name": "House Price Prediction API",
  "api_version": "0.0.1",
  "model_version": "0.1.0"
}
Let’s try the predict endpoint. Notice that it already has an example request body. Running this we get:
{
  "errors": null,
  "version": "0.1.0",
  "predictions": [
    113422.55344864173
  ]
}
Changing LotArea from 11622 to 20000, we observe no change. This is because this feature is not used by the model. If we change GrLivArea from 896 to 2000, since this is a variable used by the linear model, we expect an increase in house price value. Indeed:
{
  "errors": null,
  "version": "0.1.0",
  "predictions": [
    143329.1612864663
  ]
}
Prediction API#
In this section, we look at the main functionality of this part of our application. First, we will look at the schemas which models the responses of the endpoints. Then, we look at actual endpoints which will be serving the predictions as well as the API version. Finally, we look at logging and API settings, and how the final app is arranged.
Schemas#
Before looking at the endpoints, we look at the Pydantic models for responses of the API endpoints. First, the init file simply imports all the Pydantic models from the health and predict modules. For the health endpoint we have the health schema Health defined as follows:
class Health(BaseModel):
    name: str
    api_version: str
    model_version: str
Then, we have MultipleHouseDataInputs, and PredictionResults. Note that the structure of the latter two models are based on the corresponding schemas for validating the data for the machine learning model in the regression_model package. In fact, we explicitly import HouseDataInputSchema from the ML model package.
from typing import Any, List, Optional
from pydantic import BaseModel
from regression_model.processing.schemas import HouseDataInputSchema


class PredictionResults(BaseModel):
    errors: Optional[Any]
    version: str
    predictions: Optional[List[float]]


class MultipleHouseDataInputs(BaseModel):
    inputs: List[HouseDataInputSchema]

    class Config:
        schema_extra = {
            "example": {
                "inputs": [
                    {
                        "MSSubClass": 20,
                        "MSZoning": "RH",
                        "LotFrontage": 80.0,
                        ...
                        "YrSold": 2010,
                        "SaleType": "WD",
                        "SaleCondition": "Normal",
                    }
                ]
            }
        }
For MultipleHouseDataInputs we supplement the original schema from regression_model by adding an example input which will be used in the automatic documentation. Recall that the expected result of the make_prediction function is a dictionary containing validation errors, the package version for generating the trained ML model, and the actual predictions. Refer to the previous article if these are all new to you.
API endpoints#
Now that we’ve looked at the models, let us check out the API endpoints. These are located in api.py where we see that there are two endpoints connected to api_router. This is then connected to the main app as we shall see later. Note that the pattern for defining endpoints includes setting the HTTP method (e.g. GET or POST), setting the endpoint URL (e.g. "/health"), the Pydantic model for the response, and the status code.
First, we have the health endpoint with expected response that is a JSON object derived from the Health schema.
@api_router.get("/health", response_model=schemas.Health, status_code=200)
def health() -> dict:
    """Root GET."""

    health = schemas.Health(
        name=settings.PROJECT_NAME,
        api_version=__version__,
        model_version=model_version
    )

    return health.dict()
Note that this endpoint returns a dictionary but is converted to the appropriate response based on the response_model parameter in the endpoint decorator. The decorator also tells us that this is a GET request that results in a status code of 200 OK if successful. Here __version__ is the version of the API, model_version is the version of the ML model package, and name is the project name which we will see later in the settings object. Let’s try to make a request using HTTPie:
!http GET :8001/api/v1/health
HTTP/1.1 200 OK
content-length: 83
content-type: application/json
date: Sat, 16 Apr 2022 00:43:57 GMT
server: uvicorn

{
    "api_version": "0.0.1",
    "model_version": "0.1.0",
    "name": "House Price Prediction API"
}
The predict endpoint implements a POST async method that simply wraps our make_prediction function as an API endpoint. As discussed, the response uses the PredictionResults as a response model. Observe that we also have to specify a model for the request body, here MultipleDataInputs for input_data.
Since the make_prediction function takes in a Pandas dataframe, we had to convert input_data to a dataframe. Notice also that we make logs in all important places: inputs and outputs at INFO level, and errors at WARNING level (if there are any). Note that this is not a proper async function since make_prediction is not implemented to process asynchronous I/O.
@api_router.post("/predict", response_model=schemas.PredictionResults, status_code=200)
async def predict(input_data: schemas.MultipleHouseDataInputs) -> Any:
    """Make house price predictions with the regression model."""

    input_df = pd.DataFrame(jsonable_encoder(input_data.inputs))

    # Advanced: You can improve performance of your API by rewriting the
    # `make prediction` function to be async and using await here.
    logger.info(f"Making prediction on inputs: {input_data.inputs}")
    results = make_prediction(input_data=input_df.replace({np.nan: None}))

    if results["errors"] is not None:
        logger.warning(f"Prediction validation error: {results.get('errors')}")
        raise HTTPException(status_code=400, detail=json.loads(results["errors"]))

    logger.info(f"Prediction results: {results.get('predictions')}")

    return results
Observe that if there are errors, then we raise an HTTPException containing the errors as JSON with status code 400. Testing this out, the API specifically tells us that we passed an invalid value to "MSSubClass":
!http POST :8001/api/v1/predict <<< '{"inputs": [{"MSSubClass": "A","MSZoning": "RH","LotFrontage": 80,"LotArea": 11622,"Street": "Pave","LotShape": "Reg","LandContour": "Lvl","Utilities": "AllPub","LotConfig": "Inside","LandSlope": "Gtl","Neighborhood": "NAmes","Condition1": "Feedr","Condition2": "Norm","BldgType": "1Fam","HouseStyle": "1Story","OverallQual": 5,"OverallCond": 6,"YearBuilt": 1961,"YearRemodAdd": 1961,"RoofStyle": "Gable","RoofMatl": "CompShg","Exterior1st": "VinylSd","Exterior2nd": "VinylSd","MasVnrType": "None","MasVnrArea": 0,"ExterQual": "TA","ExterCond": "TA","Foundation": "CBlock","BsmtQual": "TA","BsmtCond": "TA","BsmtExposure": "No","BsmtFinType1": "Rec","BsmtFinSF1": 468,"BsmtFinType2": "LwQ","BsmtFinSF2": 144,"BsmtUnfSF": 270,"TotalBsmtSF": 882,"Heating": "GasA","HeatingQC": "TA","CentralAir": "Y","Electrical": "SBrkr","FirstFlrSF": 896,"SecondFlrSF": 0,"LowQualFinSF": 0,"GrLivArea": 896,"BsmtFullBath": 0,"BsmtHalfBath": 0,"FullBath": 1,"HalfBath": 0,"BedroomAbvGr": 2,"KitchenAbvGr": 1,"KitchenQual": "TA","TotRmsAbvGrd": 5,"Functional": "Typ","Fireplaces": 0,"GarageType": "Attchd","GarageYrBlt": 1961,"GarageFinish": "Unf","GarageCars": 1,"GarageArea": 730,"GarageQual": "TA","GarageCond": "TA","PavedDrive": "Y","WoodDeckSF": 140,"OpenPorchSF": 0,"EnclosedPorch": 0,"ThreeSsnPortch": 0,"ScreenPorch": 120,"PoolArea": 0,"Fence": "MnPrv","MiscVal": 0,"MoSold": 6,"YrSold": 2010,"SaleType": "WD","SaleCondition": "Normal"}]}'
HTTP/1.1 422 Unprocessable Entity
content-length: 118
content-type: application/json
date: Sat, 16 Apr 2022 00:43:58 GMT
server: uvicorn

{
    "detail": [
        {
            "loc": [
                "body",
                "inputs",
                0,
                "MSSubClass"
            ],
            "msg": "value is not a valid integer",
            "type": "type_error.integer"
        }
    ]
}
Recall that "MSSubclass" expects an int. But we can pass the string "20" and the MultipleHouseDataInputs model automatically converts this to an integer. This interaction between schemas and data for our endpoints makes FastAPI really nice to work with. Also see dependency injections which is a central feature of FastAPI.
!http POST :8001/api/v1/predict <<< '{"inputs": [{"MSSubClass": "20","MSZoning": "RH","LotFrontage": 80,"LotArea": 11622,"Street": "Pave","LotShape": "Reg","LandContour": "Lvl","Utilities": "AllPub","LotConfig": "Inside","LandSlope": "Gtl","Neighborhood": "NAmes","Condition1": "Feedr","Condition2": "Norm","BldgType": "1Fam","HouseStyle": "1Story","OverallQual": 5,"OverallCond": 6,"YearBuilt": 1961,"YearRemodAdd": 1961,"RoofStyle": "Gable","RoofMatl": "CompShg","Exterior1st": "VinylSd","Exterior2nd": "VinylSd","MasVnrType": "None","MasVnrArea": 0,"ExterQual": "TA","ExterCond": "TA","Foundation": "CBlock","BsmtQual": "TA","BsmtCond": "TA","BsmtExposure": "No","BsmtFinType1": "Rec","BsmtFinSF1": 468,"BsmtFinType2": "LwQ","BsmtFinSF2": 144,"BsmtUnfSF": 270,"TotalBsmtSF": 882,"Heating": "GasA","HeatingQC": "TA","CentralAir": "Y","Electrical": "SBrkr","FirstFlrSF": 896,"SecondFlrSF": 0,"LowQualFinSF": 0,"GrLivArea": 896,"BsmtFullBath": 0,"BsmtHalfBath": 0,"FullBath": 1,"HalfBath": 0,"BedroomAbvGr": 2,"KitchenAbvGr": 1,"KitchenQual": "TA","TotRmsAbvGrd": 5,"Functional": "Typ","Fireplaces": 0,"GarageType": "Attchd","GarageYrBlt": 1961,"GarageFinish": "Unf","GarageCars": 1,"GarageArea": 730,"GarageQual": "TA","GarageCond": "TA","PavedDrive": "Y","WoodDeckSF": 140,"OpenPorchSF": 0,"EnclosedPorch": 0,"ThreeSsnPortch": 0,"ScreenPorch": 120,"PoolArea": 0,"Fence": "MnPrv","MiscVal": 0,"MoSold": 6,"YrSold": 2010,"SaleType": "WD","SaleCondition": "Normal"}]}'
HTTP/1.1 200 OK
content-length: 68
content-type: application/json
date: Sat, 16 Apr 2022 00:43:58 GMT
server: uvicorn

{
    "errors": null,
    "predictions": [
        113422.55344864173
    ],
    "version": "0.1.0"
}
Main application#
In this section, we look at how the whole app ties together. Here we are looking at the main module. First, we define our FastAPI app object:
app = FastAPI(
    title=settings.PROJECT_NAME,
    openapi_url=f"{settings.API_V1_STR}/openapi.json"
)
The openapi_url simply provides the URL where we can view the standard OpenAPI document for our API. Then, we assign root_router = APIRouter() and define on it an index GET endpoint:
root_router = APIRouter()

@root_router.get("/", response_class=HTMLResponse)
def index():
    """Basic HTML response."""

    return (
        "<html>"
        "<body style='padding: 10px;'>"
        "<h1>Welcome to the API</h1>"
        "<div>"
        "Check the docs: <a href='/docs'>here</a>"
        "</div>"
        "</body>"
        "</html>"
    )
This simply gives us the HTML welcome message which links to the automatic docs. Then, we import api_router from the api module where we defined all our API endpoints and connect it all into our application:
app.include_router(api_router, prefix=settings.API_V1_STR)
app.include_router(root_router)
Note that having a prefix means that we must prepend all URLs with settings.API_V1_STR which here is simply "/api/v1". This is done as part of good software practice.
Logging settings#
Logging is a critical aspect of deployed applications. Logs along with things like metrics allow us to observe our server. In particular, for servers that process a large number of requests, we might even perform data analysis on logs to understand what’s happening to our server.
Observe that in the main module, logging is set up as soon as possible by calling setup_app_logging on top of the file. This is defined in the config module as follows. Notice that this simply sets the logging level for the two standard server loggers uvicorn.asgi and uvicorn.access as well intercepting anything these loggers are capturing towards Loguru sinks. The sink and logging level for the Python logger from loguru are likewise configured thereafter. Logging level can be set in LoggingSettings, e.g. logging.DEBUG to get debug level messages.
class LoggingSettings(BaseSettings):
    LOGGING_LEVEL: int = logging.INFO  # logging levels are type int


class Settings(BaseSettings):
    API_V1_STR: str = "/api/v1"
    PROJECT_NAME: str = "House Price Prediction API"
    logging: LoggingSettings = LoggingSettings()

    class Config:
        case_sensitive = True


class InterceptHandler(logging.Handler):
    ...
    # See: https://loguru.readthedocs.io/en/stable/overview.html#entirely-compatible-with-standard-logging  # noqa
    # This will be used to incercept uvicorn loggers towards Loguru sinks.


def setup_app_logging(config: Settings) -> None:
    """Prepare custom logging for our application."""

    LOGGERS = ("uvicorn.asgi", "uvicorn.access")
    logging.getLogger().handlers = [InterceptHandler()]
    for logger_name in LOGGERS:
        logging_logger = logging.getLogger(logger_name)
        logging_logger.handlers = [InterceptHandler(level=config.logging.LOGGING_LEVEL)]

    logger.configure(
        handlers=[{"sink": sys.stderr, "level": config.logging.LOGGING_LEVEL}]
    )
Tests#
In this section we will look at how to test our API using pytest. Note that our test suite consists of a single test of the predict endpoint. In the conftest.py module, we define two fixtures. The test_data fixture simply loads the test data included inside the regression_model package. Then we have the client fixture which contains TestClient.
The idea is that to make a POST request on the client and check whether the response agrees with our expectations. This includes status code, the predictions, existence of errors and so on. Incidentally, observe that the example we used in the predict endpoint is the first instance in the test dataset. Note that the JSON payload for the test client must follow the input schema for the predict endpoint.
def test_make_prediction(client: TestClient, test_data: pd.DataFrame) -> None:
    # Given
    payload = {
        # Ensure pydantic plays well with np.nan
        "inputs": test_data.replace({np.nan: None}).to_dict(orient="records")
    }

    # When
    response = client.post(
        "http://localhost:8001/api/v1/predict",
        json=payload,
    )

    # Then
    assert response.status_code == 200
    prediction_data = response.json()
    assert prediction_data["predictions"]
    assert prediction_data["errors"] is None
    assert math.isclose(prediction_data["predictions"][0], 113422, rel_tol=100)
Let us see where these tests come from.
from regression_model.processing.data_manager import load_dataset
from regression_model.predict import make_prediction
from regression_model.config.core import config

test_data = load_dataset(file_name=config.app_config.test_data_file)
test_data.head()
| Id | MSSubClass | MSZoning | LotFrontage | LotArea | Street | Alley | LotShape | LandContour | Utilities | ... | ScreenPorch | PoolArea | PoolQC | Fence | MiscFeature | MiscVal | MoSold | YrSold | SaleType | SaleCondition | |
|---|---|---|---|---|---|---|---|---|---|---|---|---|---|---|---|---|---|---|---|---|---|
| 0 | 1461 | 20 | RH | 80.0 | 11622 | Pave | NaN | Reg | Lvl | AllPub | ... | 120 | 0 | NaN | MnPrv | NaN | 0 | 6 | 2010 | WD | Normal |
| 1 | 1462 | 20 | RL | 81.0 | 14267 | Pave | NaN | IR1 | Lvl | AllPub | ... | 0 | 0 | NaN | NaN | Gar2 | 12500 | 6 | 2010 | WD | Normal |
| 2 | 1463 | 60 | RL | 74.0 | 13830 | Pave | NaN | IR1 | Lvl | AllPub | ... | 0 | 0 | NaN | MnPrv | NaN | 0 | 3 | 2010 | WD | Normal |
| 3 | 1464 | 60 | RL | 78.0 | 9978 | Pave | NaN | IR1 | Lvl | AllPub | ... | 0 | 0 | NaN | NaN | NaN | 0 | 6 | 2010 | WD | Normal |
| 4 | 1465 | 120 | RL | 43.0 | 5005 | Pave | NaN | IR1 | HLS | AllPub | ... | 144 | 0 | NaN | NaN | NaN | 0 | 1 | 2010 | WD | Normal |
5 rows × 80 columns
Directly predicting on first column using the ML model, we see that we can check whether the prediction is within 100 of 113422.55344864173 for the first element of the test dataset.
# Predict
make_prediction(input_data=test_data.iloc[[0], :])
{'predictions': [113422.55344864173], 'version': '0.1.0', 'errors': None}
Deploying to Heroku#
For a quick deployment demo, we will be deploying our application to Heroku. First, install the Heroku CLI, then run heroku autocomplete on the terminal. This will require login and registration. On the Heroku dashboard, we can create a new app. Note that our directory is a monorepo and we want only the api directory to be pushed to Heroku. This can be done by using the following command. Note that this also runs the web app as specified in the Procfile (also see the logs below).
$ heroku git:remote -a guarded-mesa-83434 # app name
$ git add .
$ git commit -m "Push API code to Heroku."
$ git subtree push --prefix api heroku main
git push using:  heroku main
Enumerating objects: 6, done.
Counting objects: 100% (6/6), done.
Delta compression using up to 8 threads
Compressing objects: 100% (4/4), done.
Writing objects: 100% (4/4), 515 bytes | 515.00 KiB/s, done.
Total 4 (delta 2), reused 0 (delta 0), pack-reused 0
remote: Compressing source files... done.
remote: Building source:
remote:
remote: -----> Building on the Heroku-20 stack
remote: -----> Using buildpack: heroku/python
remote: -----> Python app detected
remote: -----> Using Python version specified in runtime.txt
remote:  !     Python has released a security update! Please consider upgrading to python-3.9.12
remote:        Learn More: https://devcenter.heroku.com/articles/python-runtimes
remote: -----> No change in requirements detected, installing from cache
remote: -----> Using cached install of python-3.9.5
remote: -----> Installing pip 22.0.4, setuptools 60.10.0 and wheel 0.37.1
remote: -----> Installing SQLite3
remote: -----> Installing requirements with pip
remote: -----> Discovering process types
remote:        Procfile declares types -> web
remote:
remote: -----> Compressing...
remote:        Done: 211.7M
remote: -----> Launching...
remote:        Released v4
remote:        https://guarded-mesa-83434.herokuapp.com/ deployed to Heroku
remote:
remote: Verifying deploy... done.
To https://git.heroku.com/guarded-mesa-83434.git
   83f66c4..ae9fd40  ae9fd40f58c9152fd540a4e1a87c86f66af66ea2 -> main
This deploys our app on the internet:
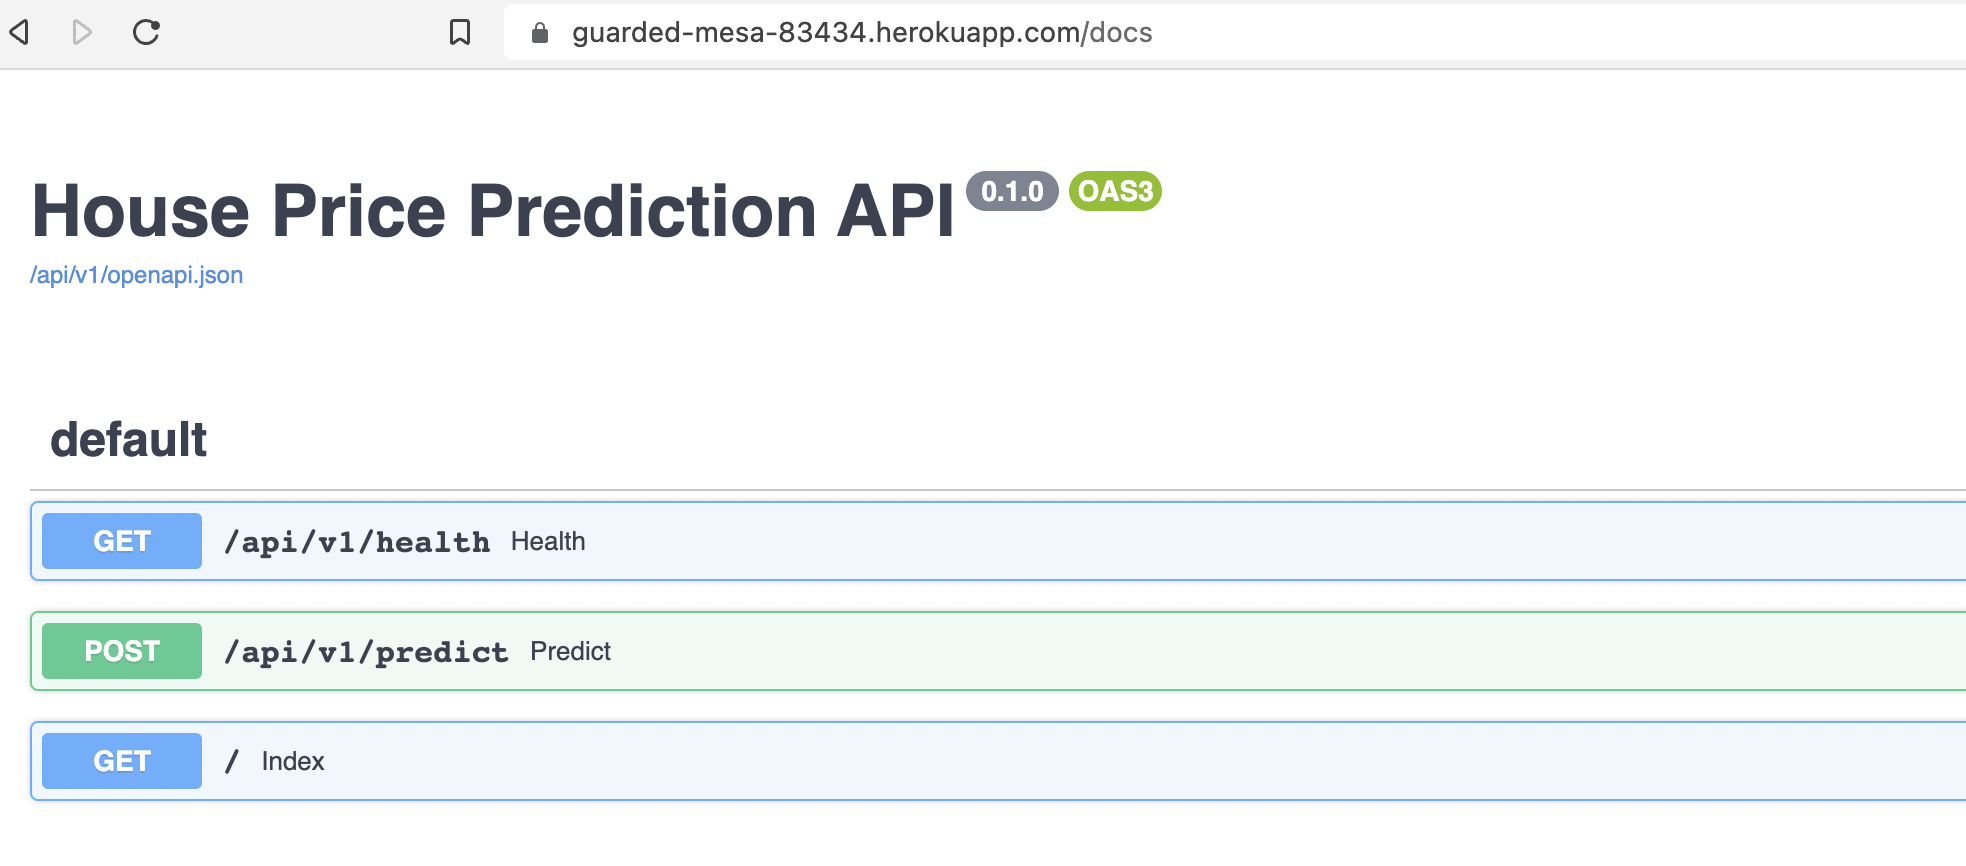
Checking the health endpoint:

Conclusion#
Now that we have deployed our app, we can think of possible improvements. For example, we may want to automate deployment every time we make a push to the code repository. And what about publishing and versioning models that are not included inside a package? Though we have used tox to automate tests, it is not yet clear whether results of models are reproducible in the created virtual environments. Also, how can we move beyond Heroku to other service providers such as AWS? In the next articles, we will systematically improve things and make the app that we’ve developed here production ready.