Continuous Integration and Deployment Pipelines#
Introduction#
In this section, we will develop a CI/CD pipeline for our model package and prediction serving API. CI/CD stands for continuous integration and continuous deployment. This involves automatic testing for changes that are being merged to the main or master branch of the code repository, as well as automatically building and deploying the model package and the associated API.
Automation means that no person needs to run a script or SSH into a machine every time a change is made to the code base, which can be time consuming and error prone. Moreover, having a CI/CD pipeline means that the system is always in a releasable state so that development teams can quickly react to issues in production. Hence, a project that has a CI/CD pipeline can have faster release cycles with changes to the code deployed on a regular basis, e.g. days instead of months. This reduces the chance of breaking things and makes it easier to integrate our piece of software to the system as changes around the model are also small.
Finally, CI/CD platforms can add visibility to the release cycles which can be important when performing audits. For our project, we will be using the CircleCI platform which has a free tier. And we will upload our model package to Gemfury which is a private package index.
CircleCI config#
CircleCI is a third party platform for managing CI/CD pipelines. This is a good all around tool with a free tier. We log in using our GitHub account. To setup CircleCI workflows, we only need to create a .circleci directory in the root of our repository which should contain a config.yml file. This allows us to setup the project in CircleCI after logging in with our GitHub account.
Recall that previously, we used tox as our main tool to train and test our model. Then, we built the model package and uploaded it to PyPI. A similar process was done for our API which was deployed to Heroku. We will continue to use tox for setting up the test environments in our CI workflows, e.g. for passing environmental variables.
version: 2


defaults: &defaults
  docker:
    - image: circleci/python:3.9.5
  working_directory: ~/project

prepare_tox: &prepare_tox
  run:
    name: Install tox
    command: |
      sudo pip install --upgrade pip
      pip install --user tox
Here & notation is YAML specific which just means we can use these variables later using *, and version specifies the version of CircleCI used. First, we define defaults which specifies the default environment settings. The other one is prepare_tox which installs and upgrades pip and installs tox. These two will be used by jobs which we define below.
Jobs#
jobs:
  test_app:
    <<: *defaults
    working_directory: ~/project/api
    steps:
      - checkout:
          path: ~/project
      - *prepare_tox
      - run:
          name: Runnning app tests
          command: |
            tox

  deploy_app_to_heroku:
    <<: *defaults
    steps:
      - checkout:
          path: ~/project
      - run:
          name: Deploy to Heroku
          command: |
            git subtree push --prefix api https://heroku:$HEROKU_API_KEY@git.heroku.com/$HEROKU_APP_NAME.git main

  train_and_upload_regression_model:
    <<: *defaults
    working_directory: ~/project/packages/regression_model
    steps:
      - checkout:
          path: ~/project
      - *prepare_tox
      - run:
          name: Fetch the data
          command: |
            tox -e fetch_data
      - run:
          name: Train the model
          command: |
            tox -e train
      - run:
          name: Test the model
          command: |
            tox
      - run:
          name: Publish model to Gemfury
          command: |
            tox -e publish_model
The << notation just inherits all contents of the variables on the same level. The checkout will checkout the source code into the job’s working_directory. First, we have test_app which runs the tests on the api directory, i.e. for the model serving API. Next, we have deploy_app_to_heroku which does not run any test, it just pushes the code to Heroku. Let us look at the tox files for the first step:
[testenv]
install_command = pip install {opts} {packages}

passenv =
	PIP_EXTRA_INDEX_URL

...
Secrets#
The only modification to the tox file above is passenv where we specify the extra index where pip will look for packages if not found in PyPI. This uses the environmental variable PIP_EXTRA_INDEX_URL. This is used in Heroku when building the prediction service with the model package as a dependency:
--extra-index-url=${PIP_EXTRA_INDEX_URL}

uvicorn[standard]
fastapi>=0.75.1,<1.0.0
python-multipart>=0.0.5,<0.1.0
pydantic>=1.8.1,<1.9.0
typing_extensions>=4.1.1<4.2
loguru>=0.5.3,<0.6.0

# Our custom package published on a private index server
regression-model==0.2.0
The private index URL follows the format https://TOKEN:@pypi.fury.io/USERNAME/ where TOKEN is an access token in Gemfury. In our case, we generate a full access token. This also serves as our push URL saved as the environmental variable GEMFURY_PUSH_URL for uploading packages to the index. Finally, HEROKU_API_KEY and HEROKU_APP_NAME are also environmental variables that we set in the project settings of CircleCI so we can deploy changes to the prediction service code to Heroku.
Remark. The extra index in the requirements file means that a package is installed from this extra index server if it cannot find it from PyPI. This is pretty bad, though it is unlikely that the tests will pass if the wrong package has been downloaded (i.e. a package with the same name and version from PyPI). To solve this, advanced package managers such as Pipenv allows specifying package indices.

Fig. 128 Setting PIP_EXTRA_INDEX as config variable in Heroku.#

Fig. 129 Environment variables in CircleCI project settings.#
Build and upload package#
Next, we have the automatic build and upload step which fetches the data from Kaggle, trains the model, and uploads the model package to Gemfury. For other projects, the fetch part can be replaced by AWS CLI from S3 bucket or making a database call. These steps depend on the tox file in the model package:
...
[testenv]
install_command = pip install {opts} {packages}

passenv =
	KAGGLE_USERNAME
	KAGGLE_KEY
	GEMFURY_PUSH_URL
...

[testenv:fetch_data]
envdir 	 = {toxworkdir}/test_package
deps 	 = {[testenv:test_package]deps}
setenv   = {[testenv:test_package]setenv}
commands =
	kaggle competitions download -c house-prices-advanced-regression-techniques -p ./regression_model/datasets
	unzip ./regression_model/datasets/house-prices-advanced-regression-techniques.zip -d ./regression_model/datasets


[testenv:publish_model]
envdir 	 = {toxworkdir}/test_package
deps 	 = {[testenv:test_package]deps}
setenv 	 = {[testenv:test_package]setenv}
commands =
	pip install --upgrade build
	python -m build
	python publish_model.py

...
Here we focus on two environments. First, the the fetch_data uses the Kaggle CLI to download the data, hence the KAGGLE_USERNAME and KAGGLE_KEY secrets are required. This can be obtained from the ~/kaggle.json file from your Kaggle account.
Next, we have publish_model which first builds the regression model package using the Python build module. This results in a dist directory containing build artifacts which are then pushed to Gemfury using publish_model.py script:
import os
import glob


for p in glob.glob('dist/*.whl'):
    try:
        os.system(f'curl -F package=@{p} {os.environ['GEMFURY_PUSH_URL']}')
    except:
        raise Exception("Uploading package failed on file {p}")
Workflows#
Next, the config.yml defines workflows. A workflow determines a sequence of jobs to run given their triggers for each push to the repository. Below we define a single workflow called regression-model.
...

workflows:
  version: 2
  regression-model:
    jobs:
      - test_app

      - train_and_upload_regression_model:
          filters:
            # Ignore any commit on any branch by default
            branches:
              ignore: /.*/
            # Only act on version tags
            tags:
              only: /^.*/

      - deploy_app_to_heroku:
          requires:
            - test_app
          filters:
            branches:
              only:
                - main
First, we have test_app running the tests for the API for each commit on each branch. Next, the model package build and upload job train_and_upload_regression_model is triggered only when new version tags are created in the git repository. Lastly, deploy_app_to_heroku is triggered for each push to main. Note that the app is deployed to Heroku only if the test_app job passes. This makes sense since we do not want to deploy an API build that fails its tests. Also note that a push to development branches does not trigger a deploy of the API.
Triggering the workflows#
Note that workflows are triggered by commits. To trigger all workflows, we will update the model package. Recall model package version in API has to be specified in its requirements file. This makes it transparent. So we need to do the following in sequence:
Bump model package version.
Release tag in the repo.
Update API requirements file.
The second step triggers automatically triggers a push to our private index of an updated model package containing a newly trained model. The last step triggers a build of the API with a new regression model version deployed to Heroku.
Updating model version#
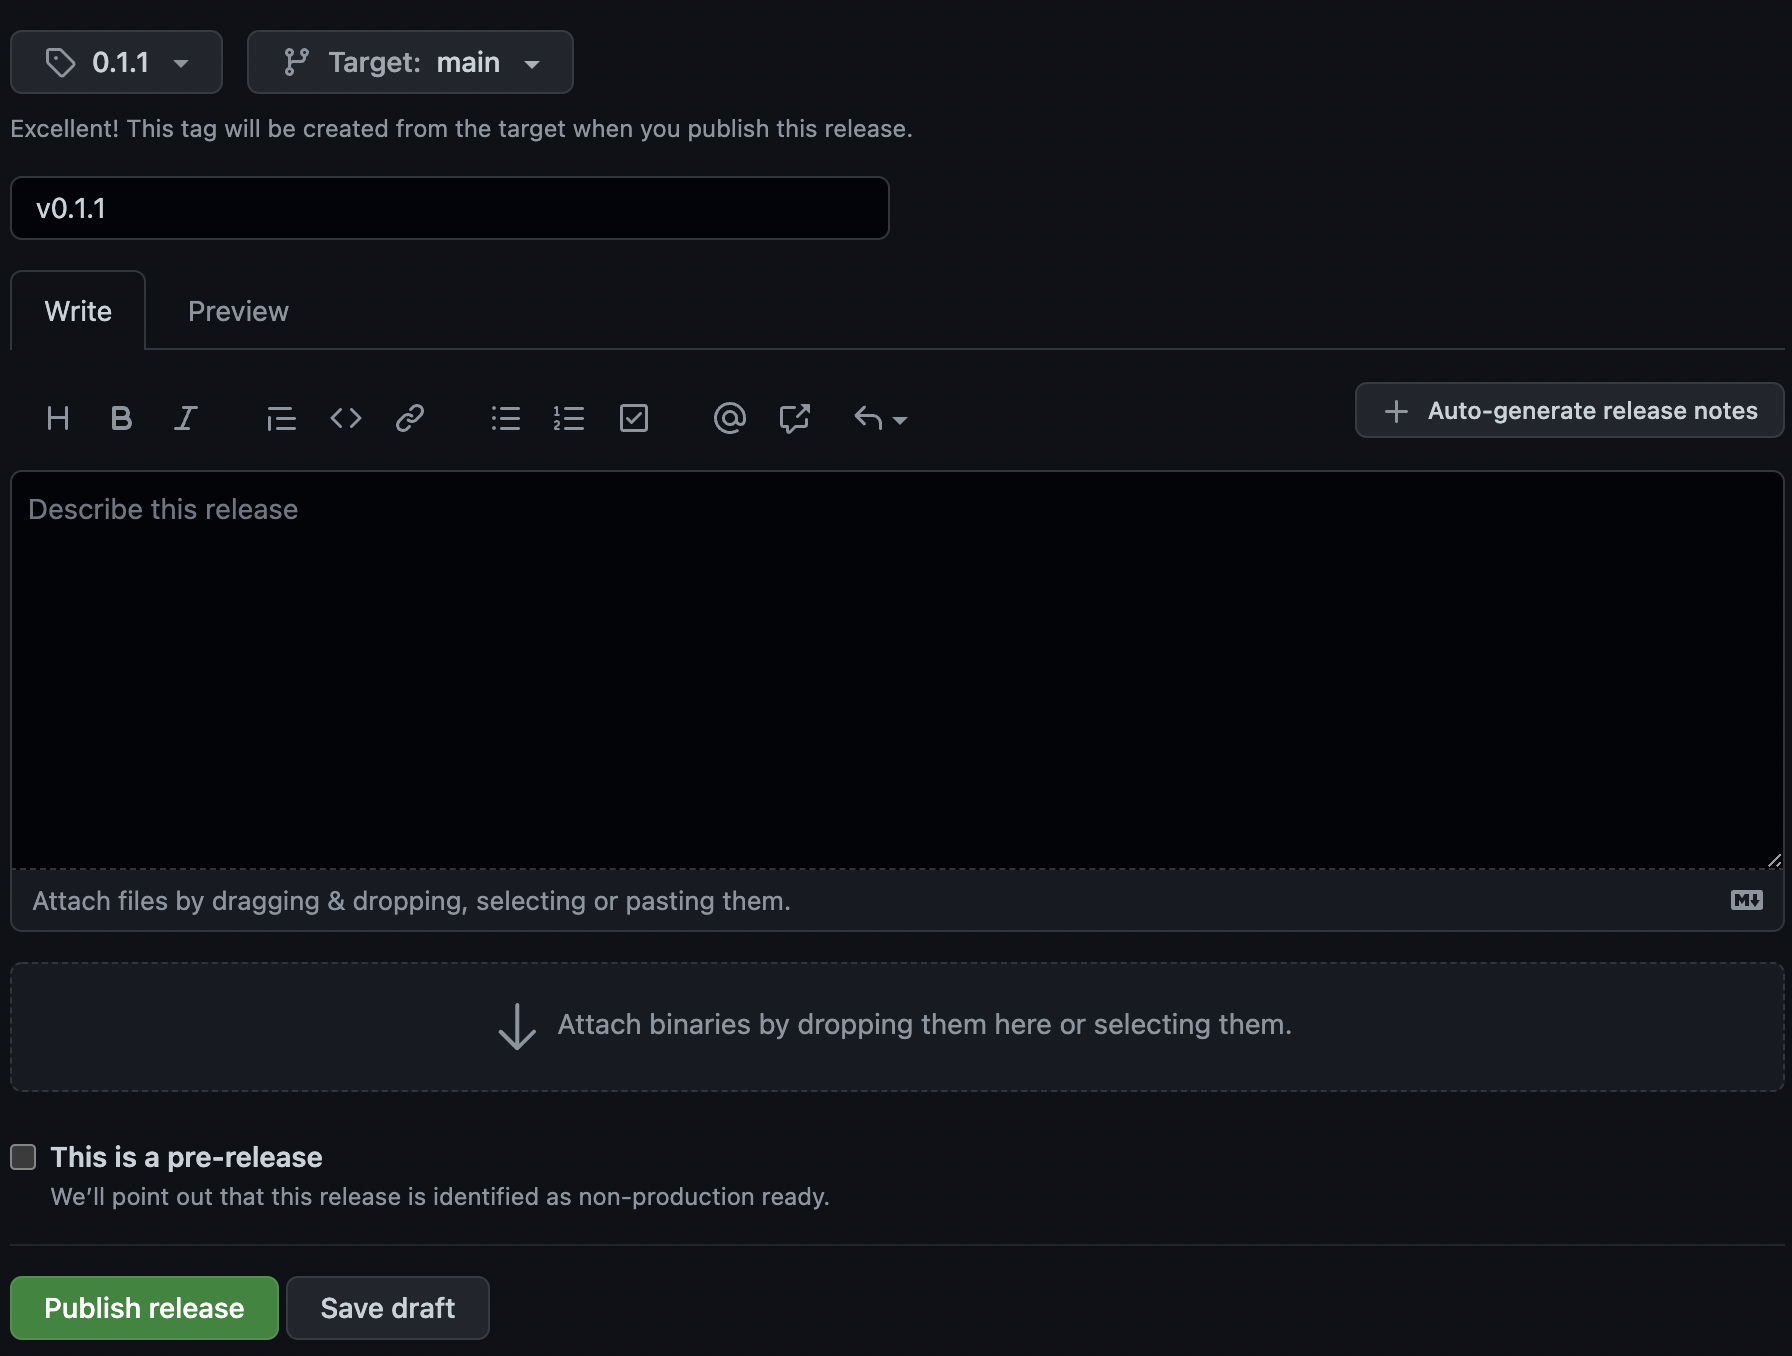
We now proceed to updating the model. Suppose we bump the model version, e.g. if the data has updated. Then, we have to make the new model available in the private index. Once this is available, we can update the model used by the prediction server and deploy it. Here we will bump the model version from 0.1.0 to 0.1.1 by changing the VERSION file. We create a new release targeted on the main branch that adheres to the model version.

Updating API requirements#
Once the package finishes uploading, we update the model package of the API in the main branch. This triggers a test, build, and deploy job. After the deployment is done, we can look in at the /api/v1/health endpoint to see that model version has updated. Note that we had to manually wait for the upload job to complete, otherwise we the package will not be found.

Fig. 130 Bump model version required by our prediction service.#


Fig. 131 Model version has updated from 0.1.0 to 0.1.1.#
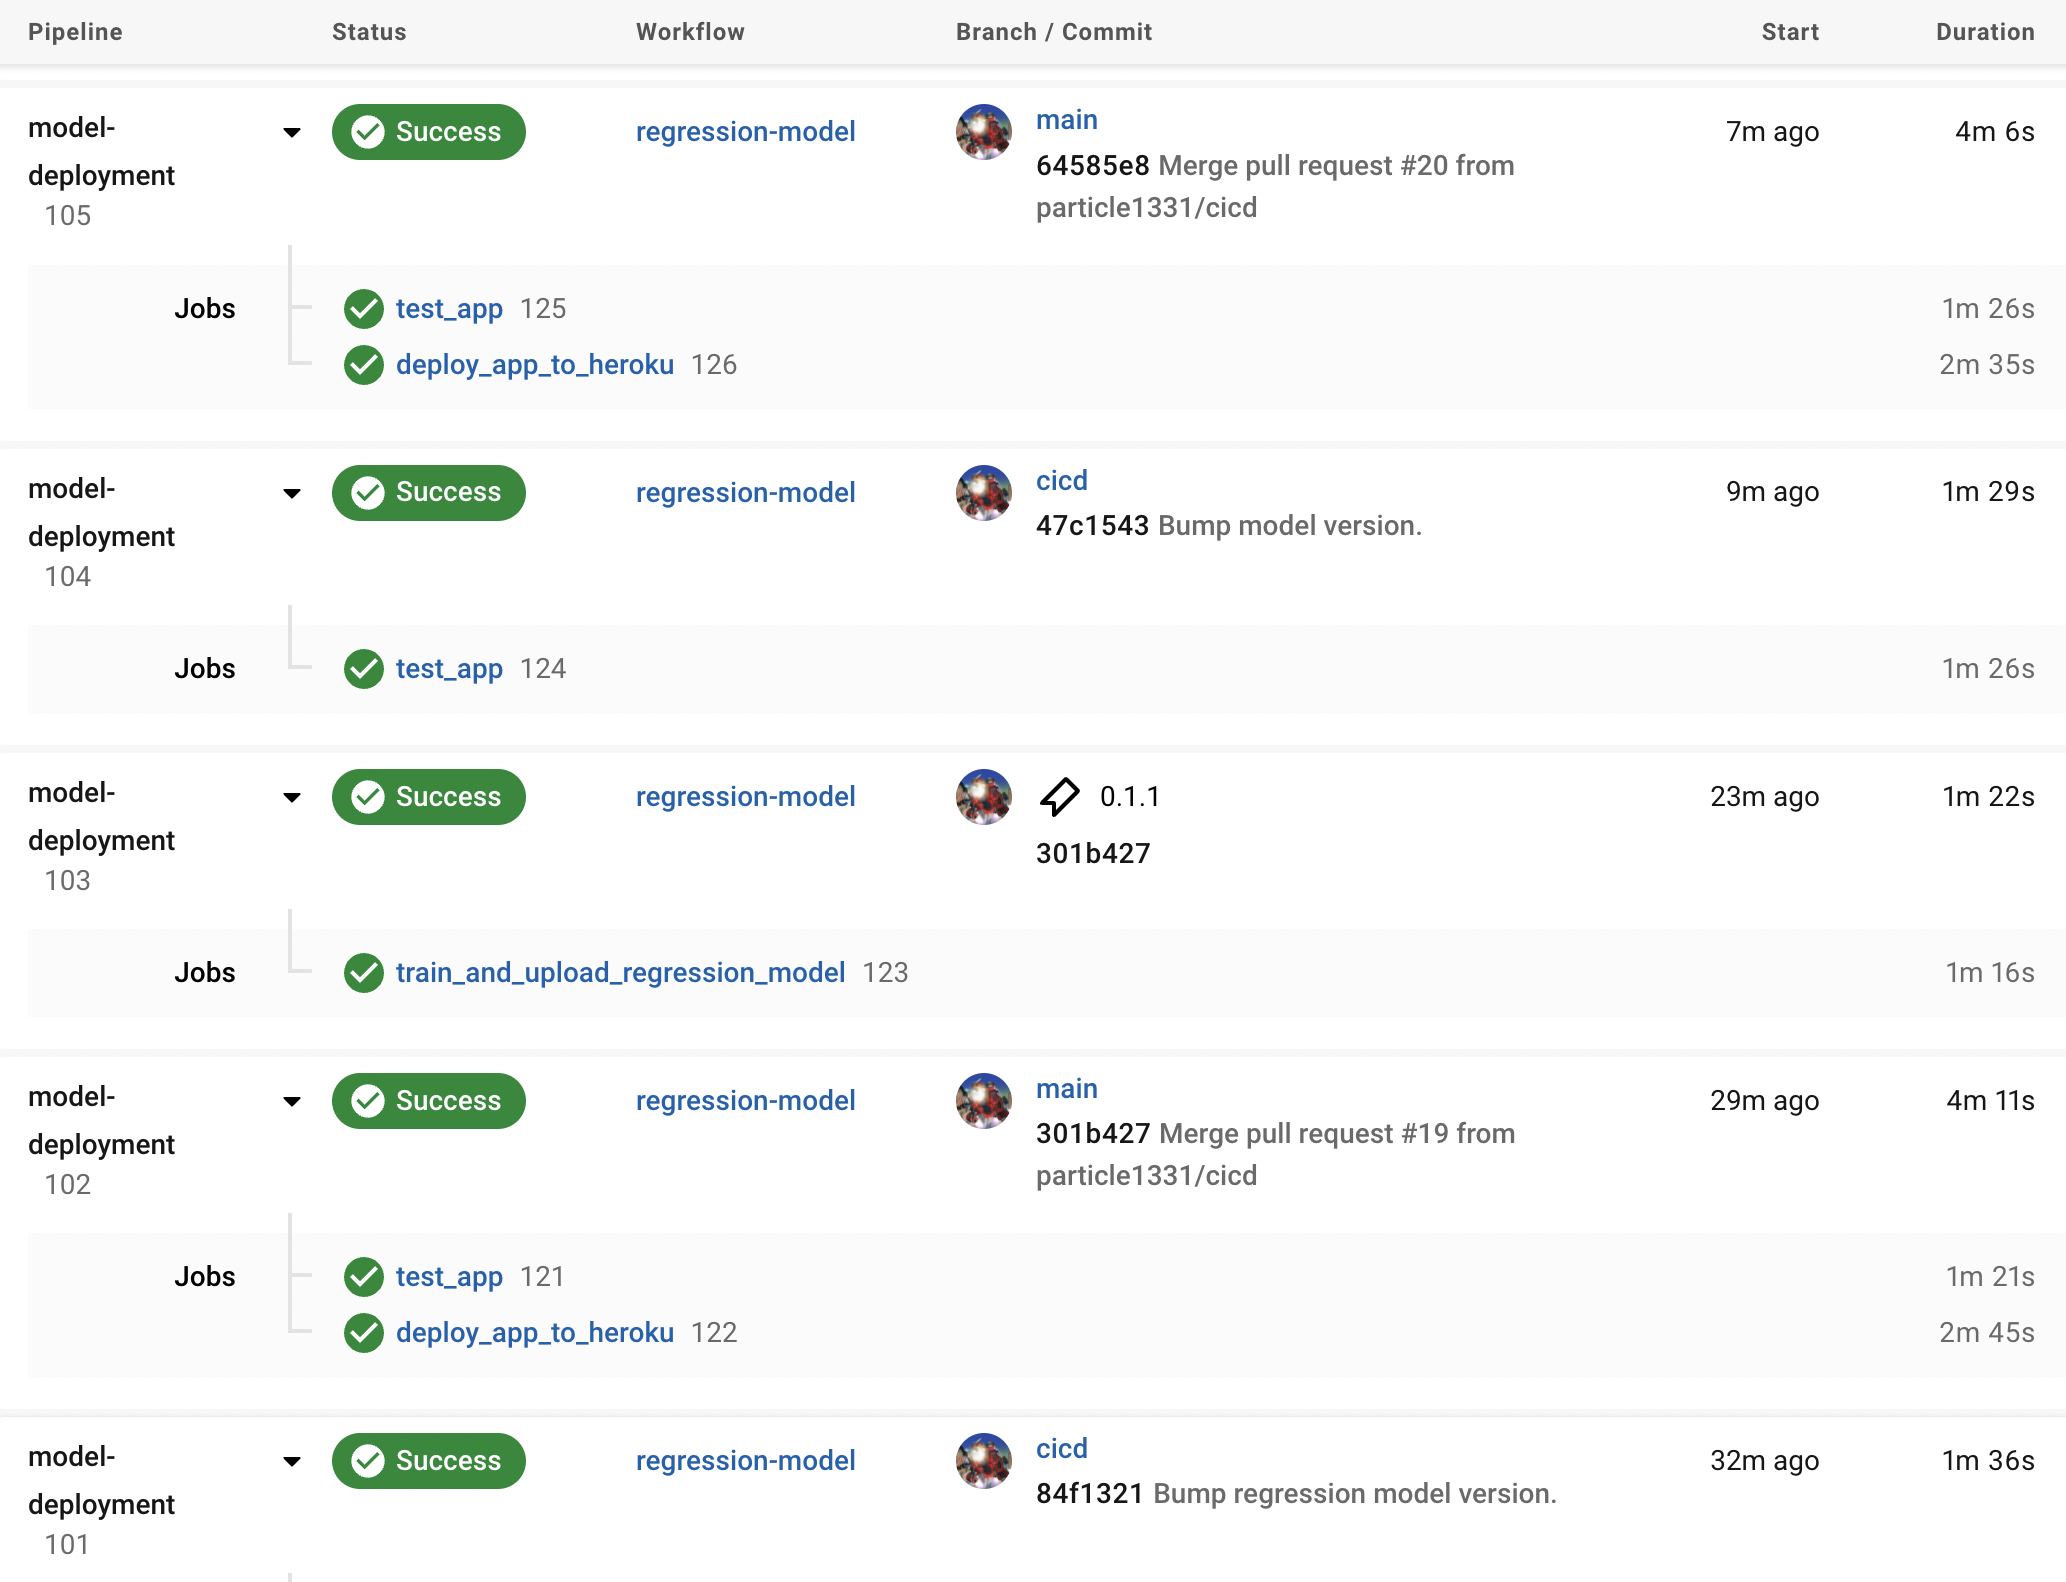
Fig. 132 The completed jobs for retraining the regression model. Having a CI pipeline adds visibility to the deployment history of the service. Note that tests are redundant.#
Dynamic workflows#
In this section, we improve upon our CI/CD pipelines by solving some issues. For example, it would be nice if for each model version bump, a build of the prediction service that uses the latest model version is automatically triggered. In the current implementation, we had to wait for the model to finish training and pushing the new package to Gemfury before we can update the prediction service. Otherwise, the update fails since it cannot find the appropriate package.
Also, there are multiple redundant tests and redundant builds which waste compute resources. We will attempt to fix this using more advanced functionalities offered by CircleCI. Note that the solutions here takes advantage of the monorepo structure of our services.
Project settings#
A simple optimization to the CI pipeline to trigger workflows only for commits on development branches that has a pull request (PR). This can be set in the project settings in CircleCI. This minimizes the number of CI tests but still makes sure that development tests are executed before the changes are merged to the main branch.

Note that the same tests will run after merging, but now on the main branch. This is necessary since there may be changes on main that are not in the respective development branch.
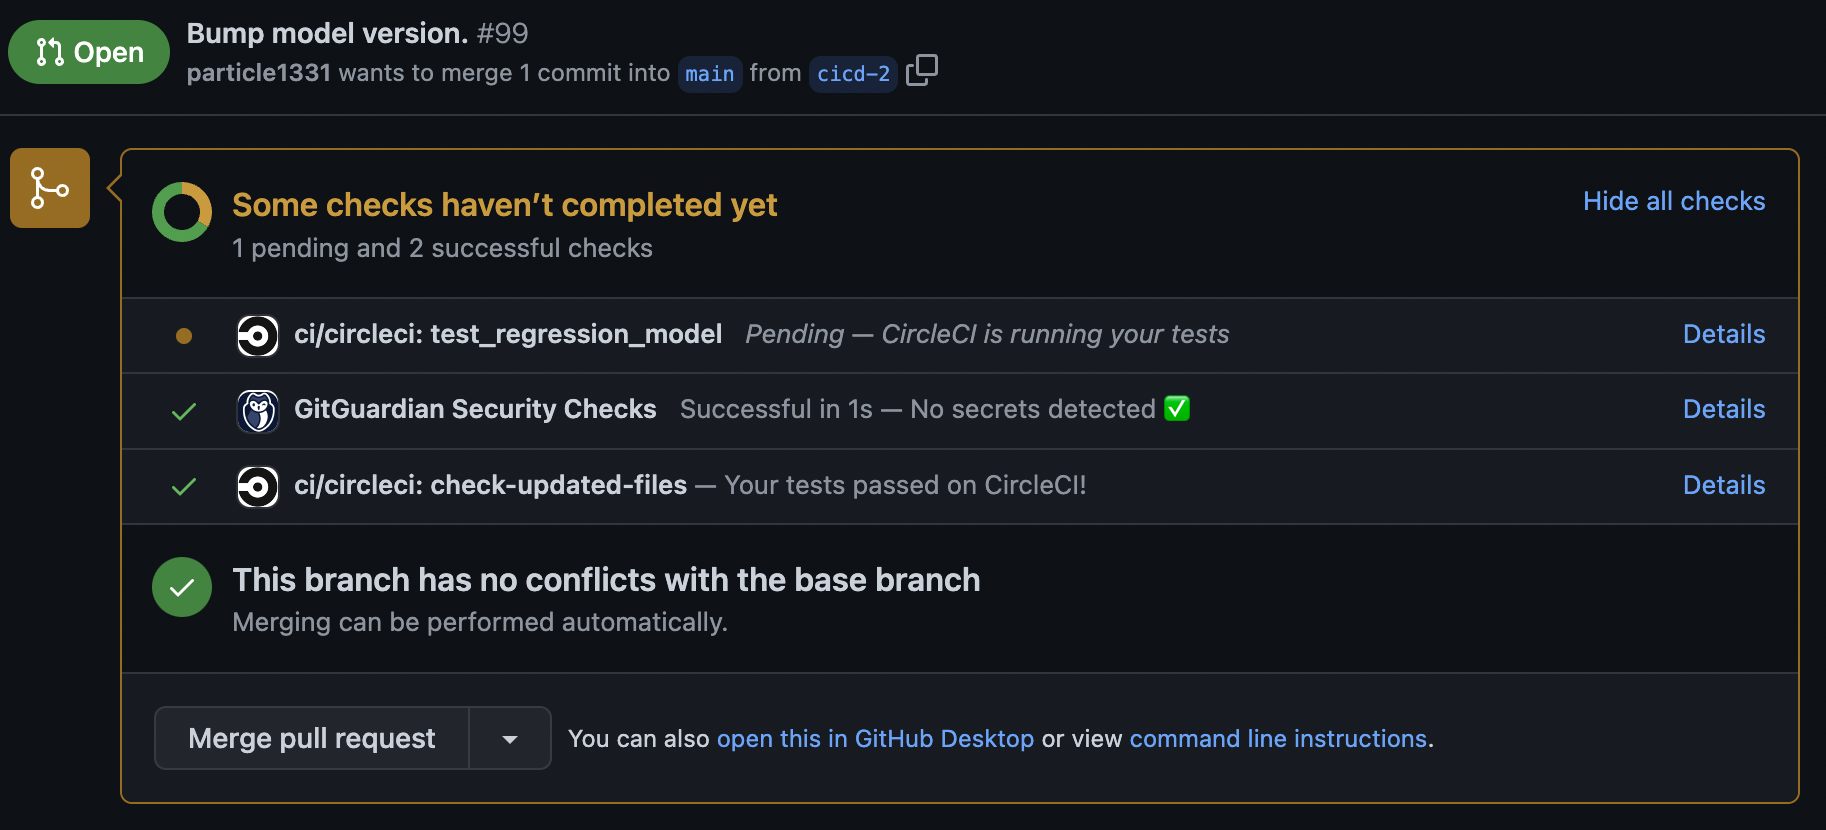
Fig. 133 Workflows being run only for commits in a pull request. Best practice is to wait for these tests to pass before approving the merge.#
Path specific triggers#
Recall that workflows are triggered by commits. In a monorepo, we have multiple services under the same version control system, but have code that are independent of each other. Hence, change in one service will trigger the test, build, and deployment jobs of all services. This was observed in our above setup. For example, updating the regression model code in the main branch triggers a test and deploy of the API. We want workflows that trigger only with commits made on specific folders. To do this we use path filtering:
version: 2.1

setup: true

orbs:
  # https://circleci.com/developer/orbs/orb/circleci/path-filtering
  path-filtering: circleci/path-filtering@0.1.1

workflows:
  always-run:
    jobs:
      - path-filtering/filter:
          name: check-updated-files
          mapping: |
            api/.* api-updated true
            packages/regression_model/.* regression-model-updated true
            packages/regression_model/regression_model/VERSION regression-model-version-bump true
          base-revision: main
          config-path: .circleci/continue_config.yml
This basically sets parameters to true depending on the paths which differs from the same path in main. Note that comparison is made with files from the main branch not with changes on the same branch. (This integrates well with the setting of only triggering workflows for commits in a PR request.) The conditional workflows are defined in continue_config.yml.
The first part of this config defines the trigger parameters:
parameters:
  api-updated:
    type: boolean
    default: false

  regression-model-updated:
    type: boolean
    default: false

  regression-model-version-bump:
    type: boolean
    default: false
Force Heroku rebuild#
Another automation we want to implement is for the prediction service to install the model package with the latest version without having to manually edit the API requirements file like before. So we update the requirements file to not specify a version of the model package. The problem with this fix is that with no change on the API code, the application will not be rebuilt in Heroku, and hence will not update the model used in production. Resetting the application’s code repository in Heroku fixes this:
  deploy_app_to_heroku:
    <<: *defaults
    steps:
      - checkout:
          path: ~/project
      - run:
          name: Setup Heroku CLI
          command: |
            curl https://cli-assets.heroku.com/install-ubuntu.sh | sh
      - run:
          name: Deploy to Heroku
          command: |
            heroku plugins:install https://github.com/heroku/heroku-repo.git
            heroku repo:purge_cache -a $HEROKU_APP_NAME
            heroku repo:reset -a $HEROKU_APP_NAME
            git subtree push --prefix api https://heroku:$HEROKU_API_KEY@git.heroku.com/$HEROKU_APP_NAME.git main
Conditional workflows#
Next, we define conditional workflows. Each of these will trigger depending on which path differs with the corresponding path in the main branch. This makes sure that tests are not redundant. For the API, a test is triggered for commits in a development branch that are part of a pull request, and the same tests are triggered in main once the changes are merged. The deploy step is “main only”, meaning it is carried out only after the changes are merged into main (e.g. not on development branches while the commits are sitting on the PR).
Similarly, modifications on the model package directory relative to main will trigger tests. This includes a train and a test step. Finally, an update of the VERSION file for the model package will trigger jobs for uploading a new package to the private package index based on code in the main branch. This is followed by a deploy of the API which is ensured to use the latest model.
workflows:
  api-update:
    when: << pipeline.parameters.api-updated >>
    jobs:
      - test_app
      - deploy_app_to_heroku:
          <<: *main_only
          requires:
            - test_app

  regression-model-update:
    when: << pipeline.parameters.regression-model-updated >>
    jobs:
      - test_regression_model

  regression-model-upload:
    when: << pipeline.parameters.regression-model-version-bump >>
    jobs:
      - train_and_upload_regression_model:
          <<: *main_only
      - test_app:
          <<: *main_only
          requires:
            - train_and_upload_regression_model
      - deploy_app_to_heroku:
          <<: *main_only
          requires:
            - test_app
Remark. Note that non-conditional workflows can also be defined here, completing all possible workflows, and keeps the primary config file clean.
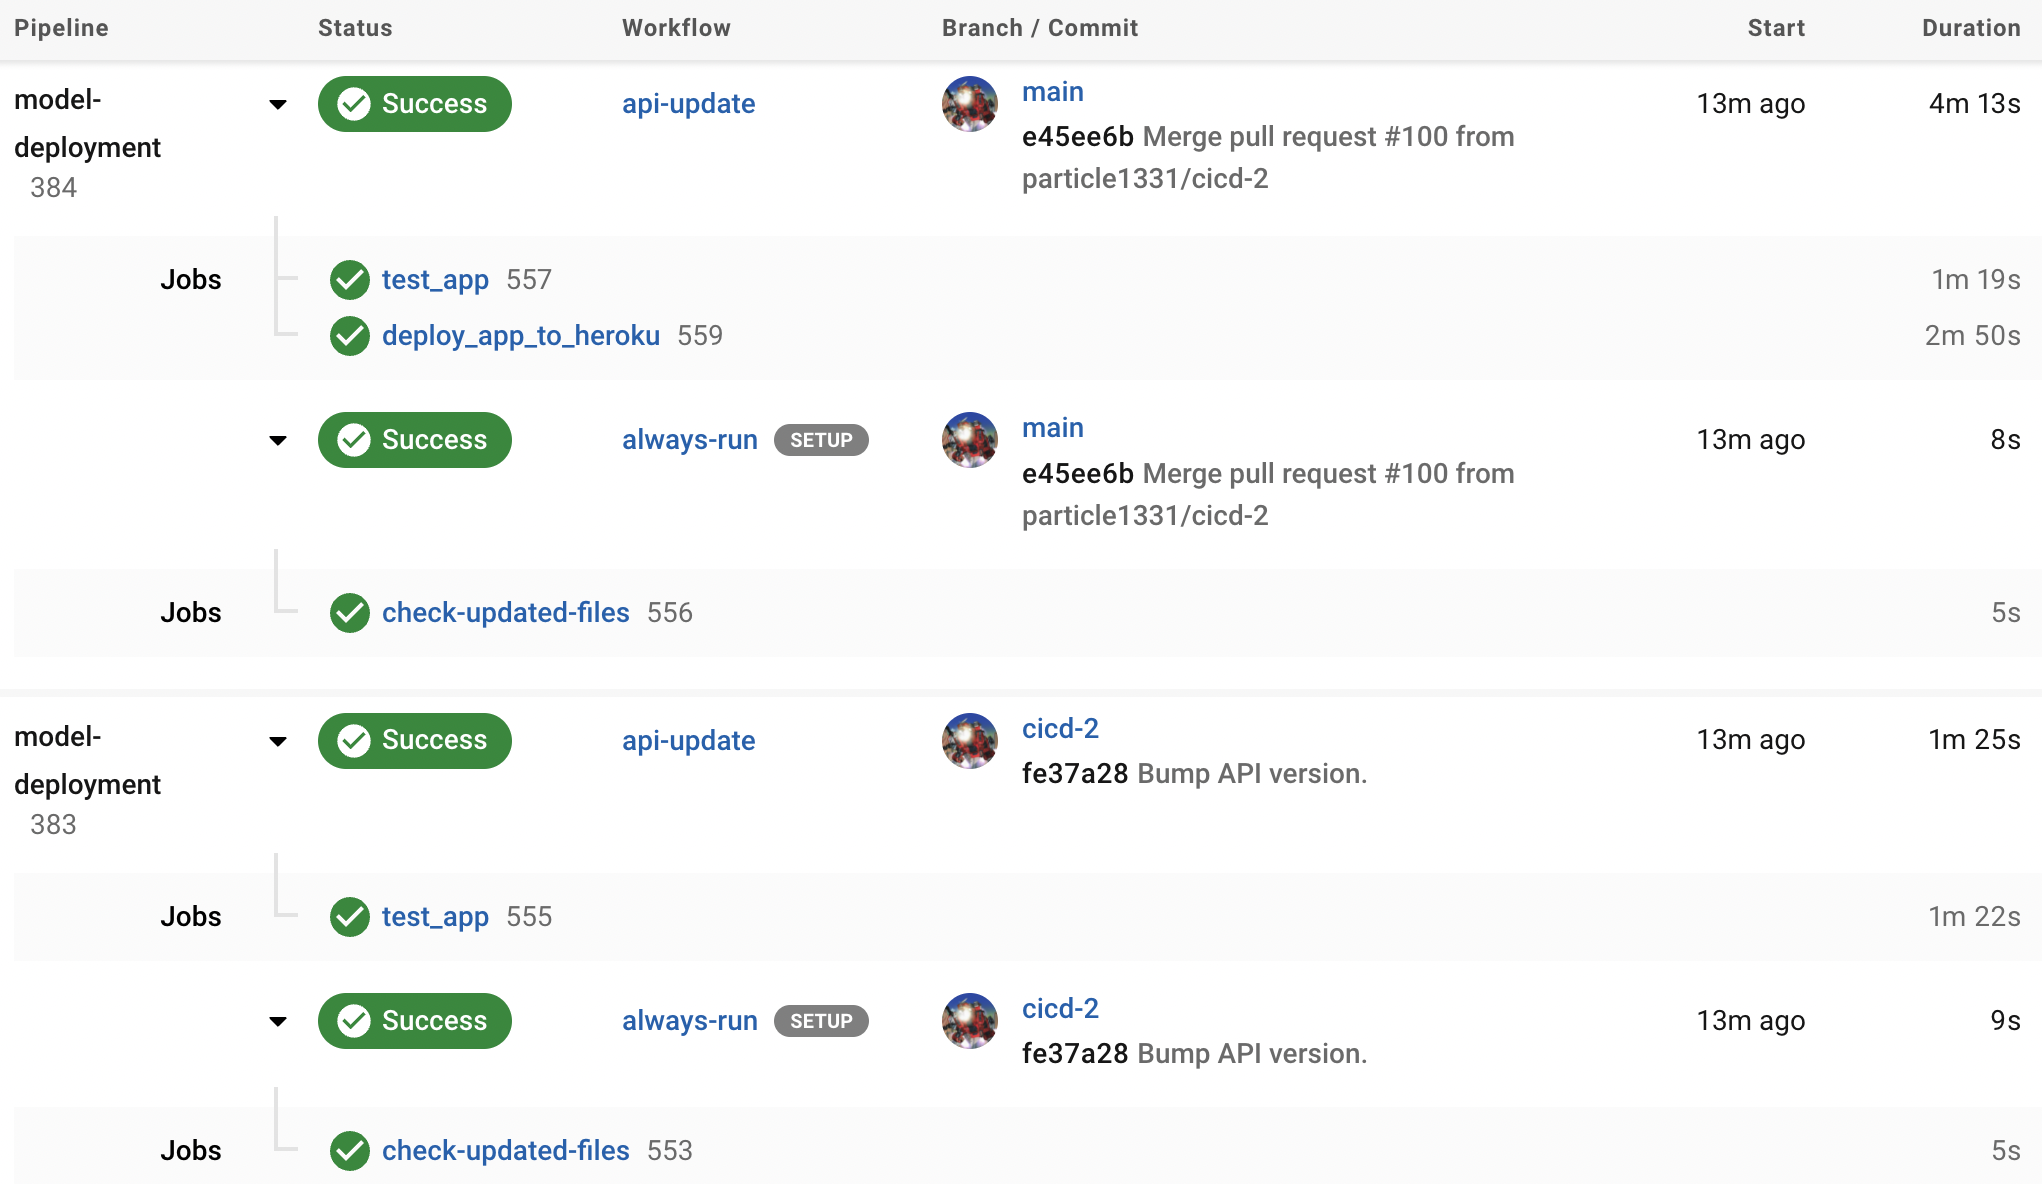
Fig. 134 API update triggered by a change in the api folder. The prediction service is deployed with the latest model package once the tests are passed.#
Releasing a new model#
Note that instead of three steps, we have now reduced bumping the model version into a single step (updating the VERSION file). Note that the jobs are triggered sequentially to ensure that the test and deploy steps use the latest model version, so no more manual waiting. Note that we do away with tags to trigger model package upload as this is redundant.
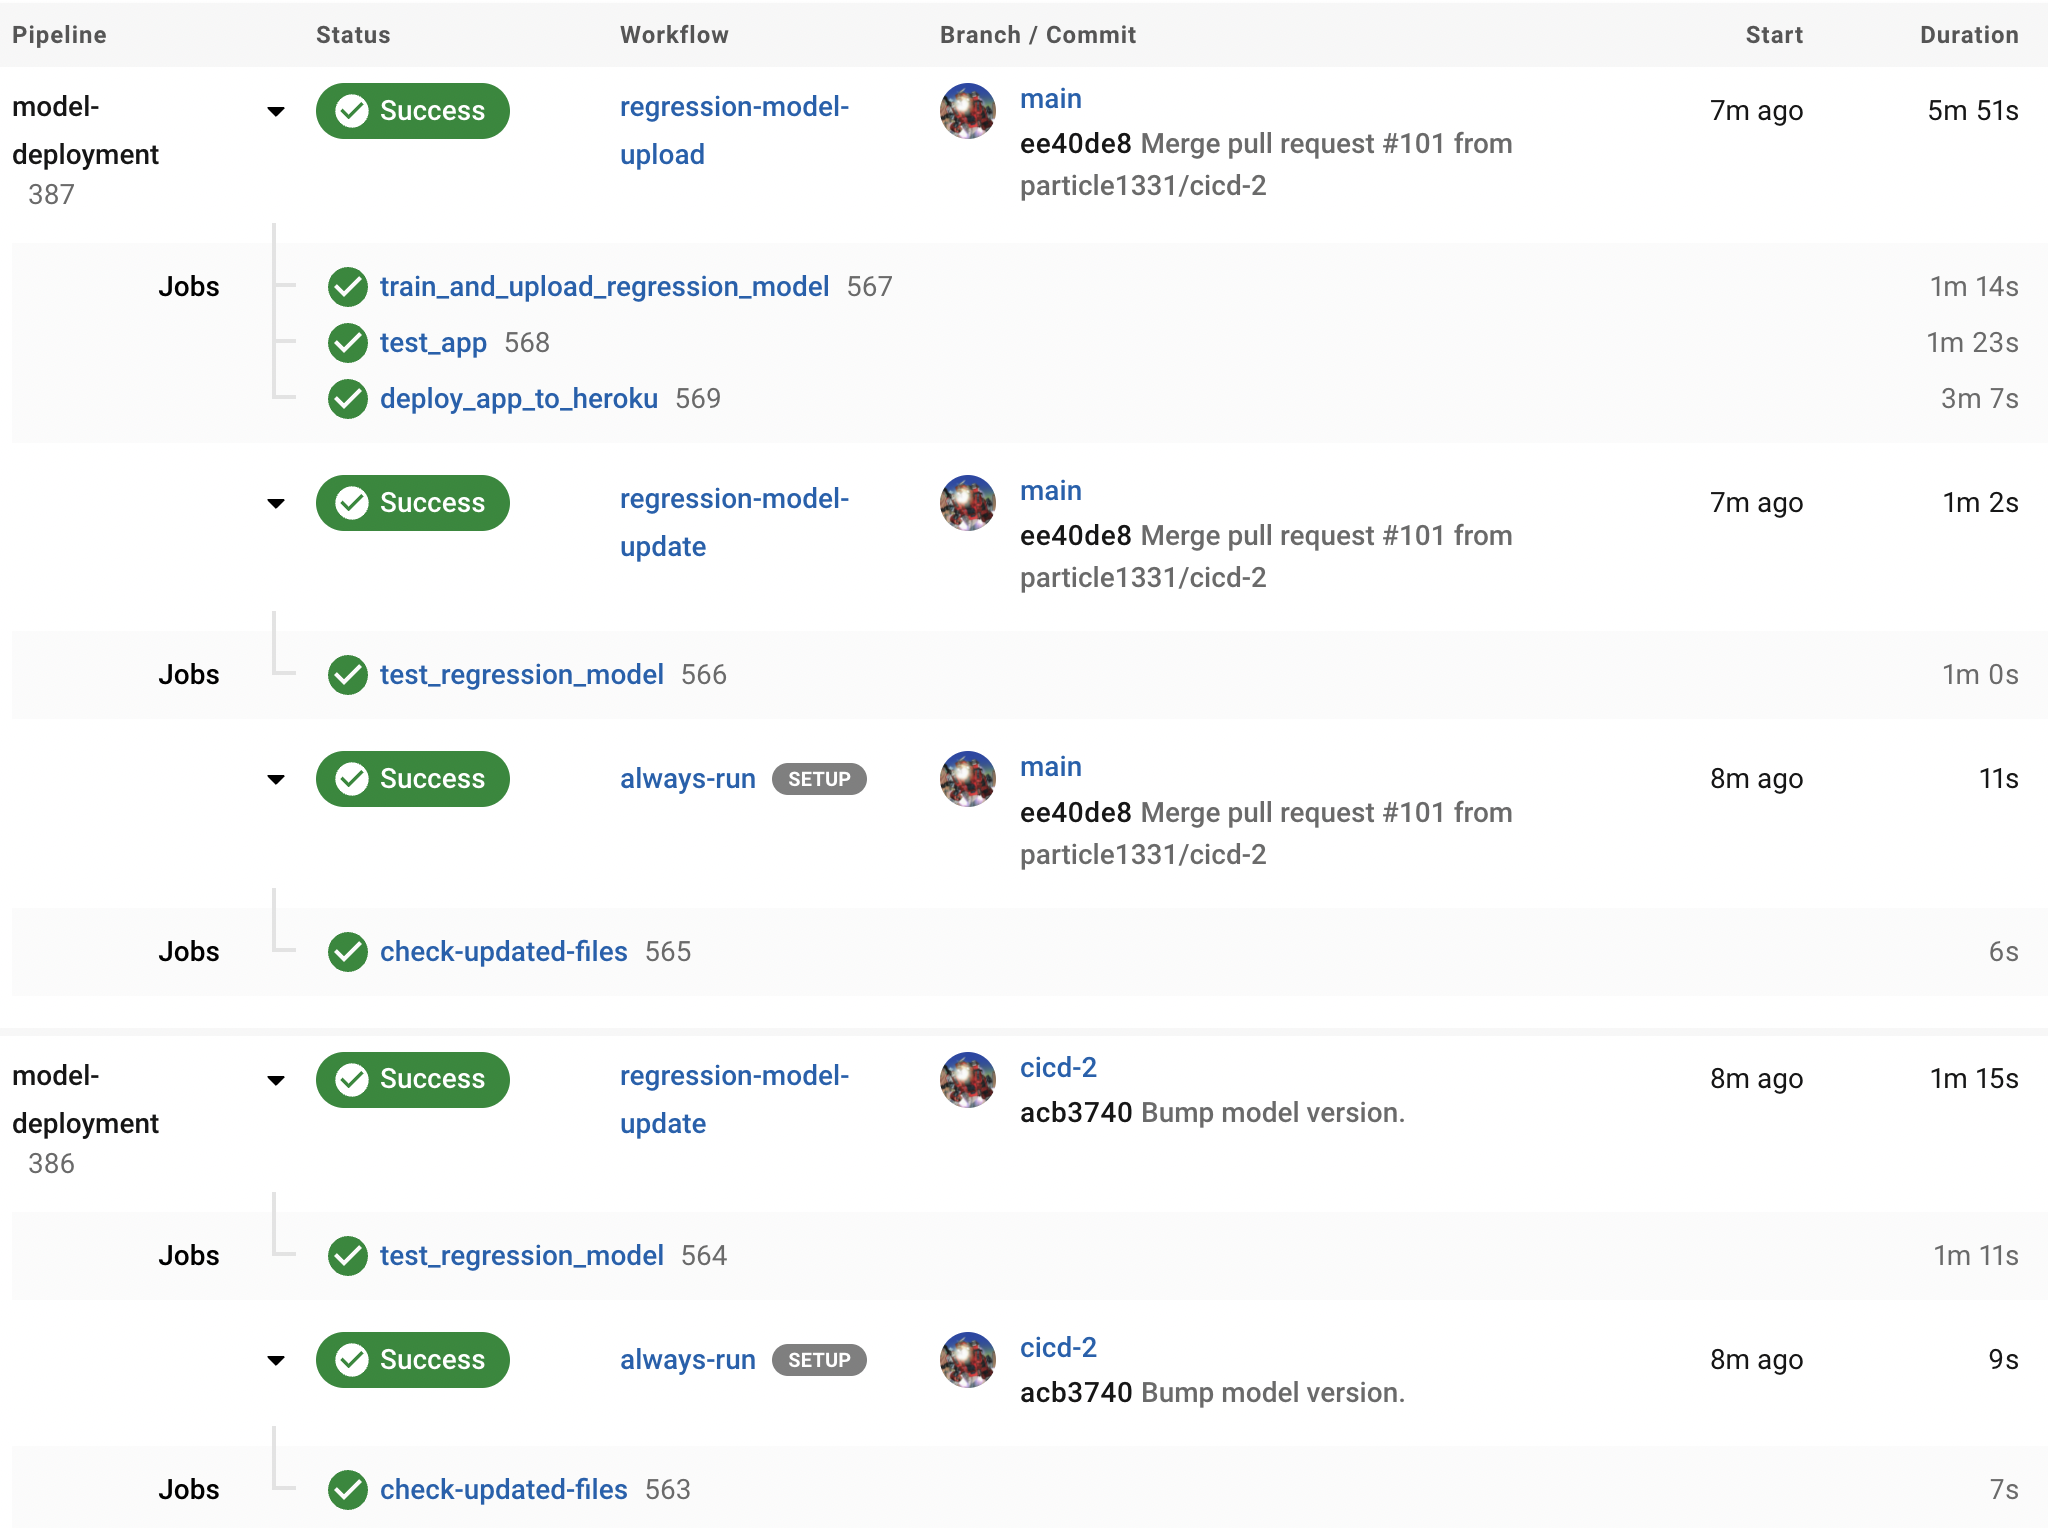
Fig. 135 Workflows triggered with a model version update. First, a test in the cicd-2 development branch is triggered. Only the model package is tested. This is followed by a test in the main branch after the merge (566). There is still some redundancy with the tests, i.e. retesting the main branch (567) before uploading and deploying the API. But here we can, for example, inject further tests for the model that will be deployed to production.#
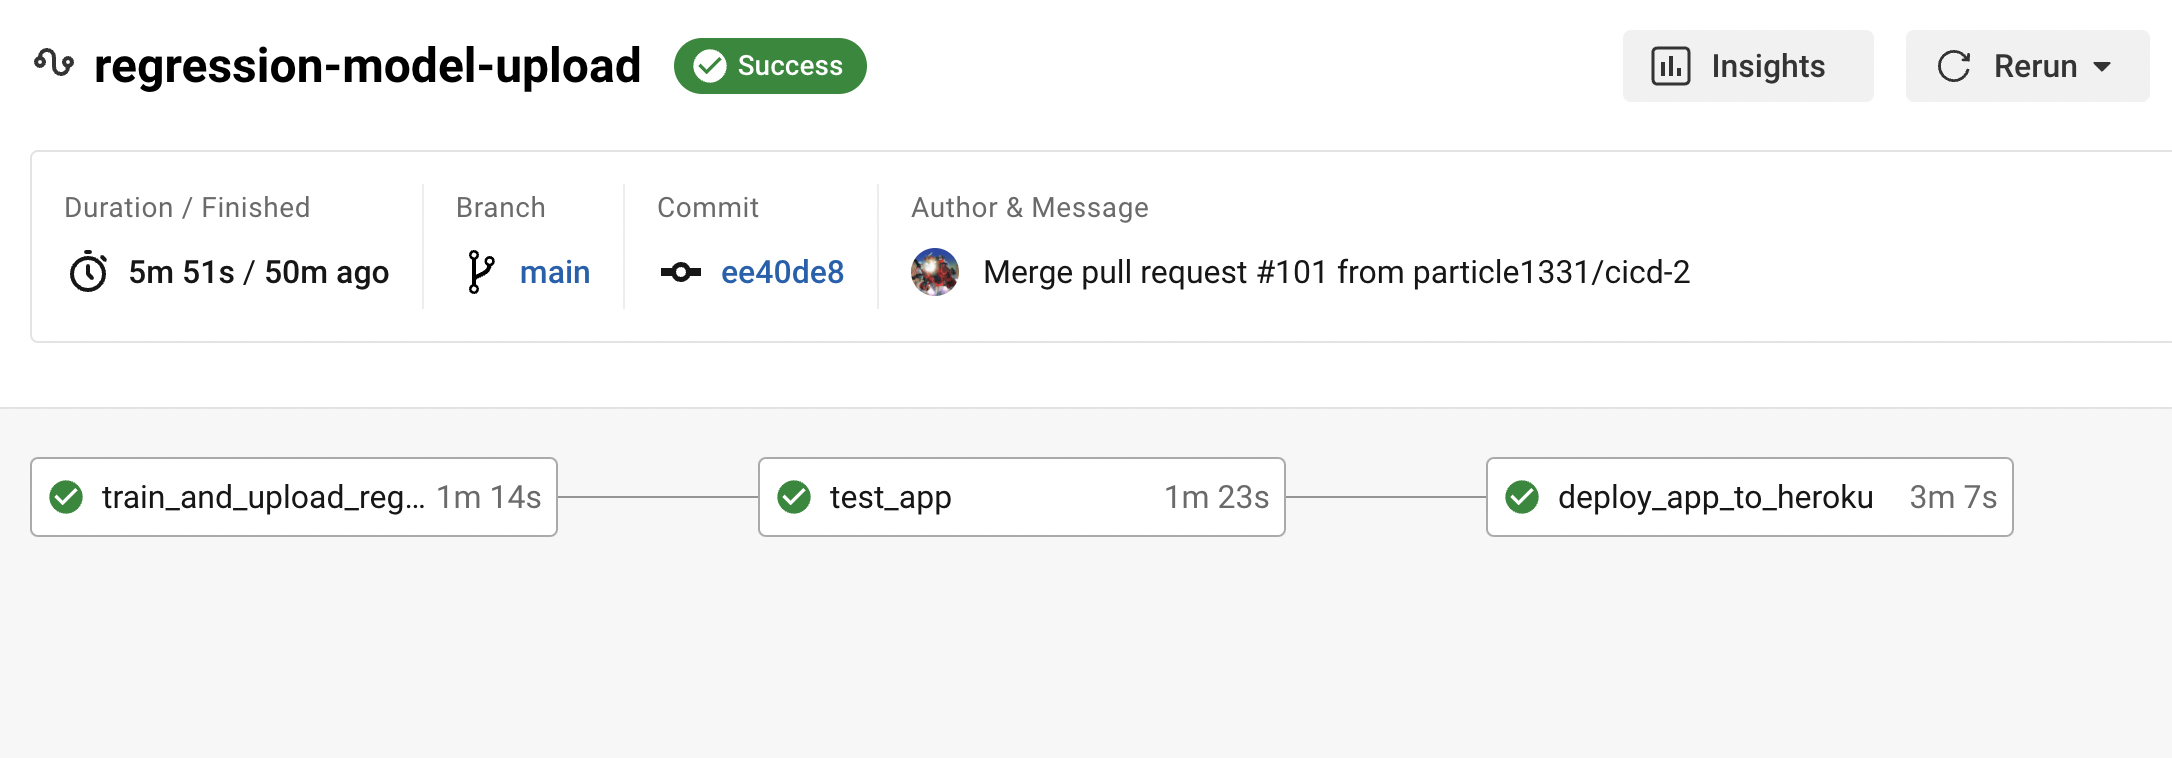
Fig. 136 Workflow triggered by an update of the VERSION file. Note the serial dependency that ensures the API uses the latest model package.#
Conclusion#
In this article, we designed a CI pipeline for our regression model package and prediction service monorepo. We were able to optimize the pipeline so that it minimizes the number of tests. Moreover, the pipeline allows us to build new models and deploy a prediction service that uses the updated model by pushing only a single commit. At each step, and for PRs to the main branch, tests are run by the pipeline to ensure code correctness. All of these can all be done without any manual waiting (though, it is best practice to wait for the PRs to complete before merging) and remembering of the specific sequence and checklist of steps to follow.
Next steps would be to include tests in the CI pipeline that monitor changes in model prediction, i.e. comparing new model predictions to old ones when performing model updates. Another improvement would be to build and deploy Docker images instead of packages, and upload these images to some container registry which is then accessed by a consuming application. Note that this is a fairly general procedure that can be adapted to other cloud platforms or service providers such as AWS.


